How to adjust chain slack
Safety first
The correct tension of the motorcycle's transmission chain is a very simple task that, if performed periodically, greatly extends the life of the transmission components, reduces fuel consumption, and makes the vehicle's response smoother. Let's take a closer look at the steps for a correctly performed adjustment that can be done by anyone with a few tools.
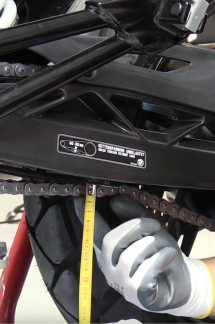
First, let's verify the tolerance of the chain. In this case, our motorcycle has a label on the swingarm that indicates the values. In other cases, the information can be found in the user manual. Measure with the help of a tape measure, but it doesn't need to be extremely precise. We have a tolerance range within which we can work.
Next, let's check which wrenches or tools we need and get them ready. If we work in an organized manner, we can cut the time in half.
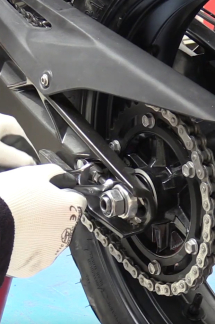
In our case, the chain is too loose, with a slack greater than the maximum recommended tolerance from the manufacturer. Therefore, we need to restore the correct tension. Loosen the bolt on the wheel axle, but not too much. Now, let's unscrew the bolts on the horizontal threaded tensioner, which adjusts the distance of the wheel axle and is present on both sides of the swingarm.
Once this moment is reached, we will finally have the opportunity to advance the wheel longitudinally, thus pushing the wheel towards the rear of the motorcycle and generating greater tension in the chain.
In order to achieve this goal, it is essential to carefully adjust the two bolts of the threaded tensioner so that the wheel remains exactly at the predetermined distance. This operation will also need to be repeated on the opposite side in order to obtain correct and uniform tension on both sides. To further simplify the adjustment process, it will be necessary to insert a non-metallic shim to avoid damaging the teeth of the sprocket. By then slightly rotating the wheel forward, we will create the necessary tension for proper transmission.
Once the two tensioner bolts have been adjusted, it is important to carefully check the indicators on the wheel axle for perfect alignment. Only then can we tighten the central bolt of the wheel axle. Finally, as a final step, we will repeat the measurement to ensure that the chain tension falls within the values indicated by the manufacturer. It is also essential to remember to periodically clean the chain and lubricate it with specific products to ensure proper and long-lasting functionality.


